Android 免修考试
1. 理解基本组件 Activity 的相关知识(如重载方法)。
活动(Activity)是 Android 应用程序提供交互界面的一个重要组件,也是 Android 重要
组件之一,是一个用来与用户交互的系统模块,几乎所有的 Activity 都是和用户进行交互的。
Activity 的四种状态
活动是 Android 程序的表现层,显示可视化的用户界面,并接收与用户交互所产生的界
面事件活动。活动可表现为以下四种状态:
- (1)运行(Running)状态:活动在用户界面中处于最上层,能完全被用户看到,能与用
户进行交互;活动正处于运行状态。 - (2)暂停(Paused)状态:活动在界面上被部分遮挡,该活动不再处于用户界面的最上
层,且不能够与用户进行交互;活动正在执行中,在系统内存不够时被回收。 - (3)停止(Stopped)状态:活动在界面上完全不能被用户看到,即该活动被其他活动全
部遮挡;活动正在执行中,但已退出界面。 - (4)销毁(Destroyed)状态:不在以上三种状态中的活动,如活动已被回收或未启动。
Activity 的生命周期与重载方法
Activity 有如下重载方法
public class Activity extends ApplicationContext {
   protected void onCreate(Bundle savedInstanceState);
   protected void onStart();
   protected void onRestart();
   protected void onResume();
   protected void onPause();
   protected void onStop();
   protected void onDestroy();
}
这些方法代表了 Activity 生命周期的不同阶段:
| 重载方法 | 描述 | 是否可终止 | 下一个操作 |
|---|---|---|---|
| onCreate() | 活动启动后第一个被调用的函数,常用来初始化活动,如创建视图、绑定数据或恢复信息等 | 否 | onStart() |
| onStart() | 当活动显示在屏幕上时,该函数被调用 | 否 | onResume() |
| onRestart() | 当活动从停止状态进入运行状态前,调用该函数 | 否 | onResume()或 onStop() |
| onResume() | 当该函数能与用户交互,接收用户输入时,该函数被调用。此时该函数位于该函数栈的栈顶 | 否 | onPause() |
| onPause() | 当活动进入暂停状态时,该函数被调用。常用来保存持久的数据或释放占用的资源 | 是 | onResume() 或 onStop() |
| onStop() | 当活动进入停止状态时,该函数被调用 | 是 | onRestart()或 onDestroy() |
| onDestroy() | 在活动被终止前,即进入销毁状态前,该函数被调用 | 是 | 无 |
Activity 的四种加载模式
- standard:标准模式,一旦调用 startActivity()方法就会产生一个新实例。这种模式下
的活动可被实例化多次。 - singleTop:Task 顶单例模式,若已有一个实例位于活动栈顶部,就不产生新实例,只是
调用活动中的 newInstance()方法。若不位于栈顶,则会产生一个新实例。这种模式下的活动也
可被实例化多次。 - singleTask:Task 内单例模式,会在一个新任务中产生这个实例,以后每次调用都会使
用该实例,而不会产生新实例。 - singleInstance:全局单例模式,会在一个新任务中产生这个实例,以后每次调用都
会使用该实例,而不会产生新的实例。该模式与 singleTask 基本相同,唯一的区别在于:在
该模式下的活动实例所处的任务中,只能有这个活动实例,不能有其他实例。
2. 理解Android应用程序开发过程中,常见的四种设计模式各自的使用场合。
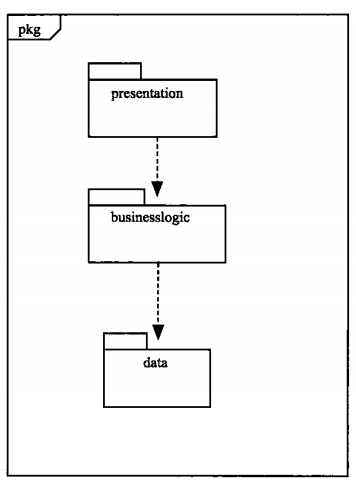
3. 理解软件开发中的三个分层结构各自的作用。
分层体系结构风格将系统分为三层:展示层(presentation)、业务逻辑层(bussinesslogic)、数据层(data)。
- 展示层负责用户交互的实现。
- 业务逻辑层负责业务逻辑处理的实现。
- 数据层负责数据的持久化和访问。
4. 理解 Android Manifest.xml 文件的作用,以及里面常见的配置项。
每个应用的根目录中都必须包含一个 AndroidManifest.xml 文件(且文件名精确无误)。 清单文件向 Android 系统提供应用的必要信息,系统必须具有这些信息方可运行应用的任何代码。
常见配置项包括:
<activity> <service> <provider> <receiver> 应用程序组件
该应用程序由哪些活动(Activity)、服务(Service)、广播接收器(BroadcastReceiver)和内容提供者(ContentProvider)组件构成。
<intent-filter> Intent 过滤器
应用的核心组件(例如其 Activity、服务和广播接收器)由 intent 激活。Android 系统会查找合适的组件来响应 intent
<intent-filter android:icon="drawable resource"
               android:label="string resource"
               android:priority="integer" >
    . . .
</intent-filter>
<uses-permission> 权限
声明应用程序必须拥有哪些权限
<uses-permission android:name="string"
        android:maxSdkVersion="integer" />
<uses-library> 链接库
列出应用程序必须链接的库。
<uses-library
  android:name="string"
  android:required=["true" | "false"] />
<uses-sdk> sdk 版本
声明应用程序所需要的 Android API 的最低版本,例如 1.0、1.5 和 1.6 等。
<uses-sdk android:minSdkVersion="integer"
          android:targetSdkVersion="integer"
          android:maxSdkVersion="integer" />
5. Android中什么视图(View)支持网页的缩放?
6.理解AyncTask的4个工作阶段——doInBackGround(),onPreExecute(),onPostExecute(),onProgressUpdate()。
AyncTask 是一种轻量级的异步任务类。它可以在线程池中执行后台任务。然后把执行的进度和最终结果传递给主线程并在主线程中更新UI。AyncTask 提供了 Params、Progress 和 Result 这三个泛型参数。
AyncTask 类的声明如下:
public abstract class AyncTask<Params, Progress, Result>AyncTask提供了4个核心方法:
- onPreExecute()。该方法在主线程中执行,用于在执行异步任务之前做一些准备工作。
- doInBackGround(Prams…params)。在线程池中执行,此方法用于执行异步任务。参数 prams 表示异步任务的输入参数。此方法中可以通过 publishProgress 方法来更新任务进度(publishProgress 又会调用 onProgressUpdated 方法),此方法需要返回计算结果给 onPostExcute 方法。
- onProgressUpdated(Result result)。在主线程中执行。当后台任务进度改变后,会被调用。
- onPostExcute(Result result)。在主线程中执行。在异步任务执行完成之后,该方法会被调用。其中 result 就是任务的返回值,即 doInBackGround 方法的返回值。
上面四个工作阶段是依次执行的。简单来说,分别代表了任务准备、任务进行、进行中进度通知、任务完成结果获得的四个阶段。
下面是 AyncTask 类用于文件下载后台任务的一个具体使用:
private class DownloadTask extends AsyncTask<String, Integer, String> {

    private Context context;
    private PowerManager.WakeLock mWakeLock;

    public DownloadTask(Context context) {
        this.context = context;
    }

    @Override
    protected void onPreExecute() {
        super.onPreExecute();
        // take CPU lock to prevent CPU from going off if the user
        // presses the power button during download
        PowerManager pm = (PowerManager) context.getSystemService(Context.POWER_SERVICE);
        mWakeLock = pm.newWakeLock(PowerManager.PARTIAL_WAKE_LOCK,
             getClass().getName());
        mWakeLock.acquire();
        mProgressDialog.show();
    }

    @Override
    protected void onProgressUpdate(Integer... progress) {
        super.onProgressUpdate(progress);
        // if we get here, length is known, now set indeterminate to false
        mProgressDialog.setIndeterminate(false);
        mProgressDialog.setMax(100);
        mProgressDialog.setProgress(progress[0]);
    }


    @Override
    protected String doInBackground(String... sUrl) {
        InputStream input = null;
        OutputStream output = null;
        HttpURLConnection connection = null;
        try {
            URL url = new URL(sUrl[0]);
            connection = (HttpURLConnection) url.openConnection();
            connection.connect();

            // expect HTTP 200 OK, so we don't mistakenly save error report
            // instead of the file
            if (connection.getResponseCode() != HttpURLConnection.HTTP_OK) {
                return "Server returned HTTP " + connection.getResponseCode()
                        + " " + connection.getResponseMessage();
            }

            // this will be useful to display download percentage
            // might be -1: server did not report the length
            int fileLength = connection.getContentLength();

            // download the file
            input = connection.getInputStream();
            output = new FileOutputStream("/sdcard/file_name.extension");

            byte data[] = new byte[4096];
            long total = 0;
            int count;
            while ((count = input.read(data)) != -1) {
                // allow canceling with back button
                if (isCancelled()) {
                    input.close();
                    return null;
                }
                total += count;
                // publishing the progress....
                if (fileLength > 0) // only if total length is known
                    publishProgress((int) (total * 100 / fileLength));
                output.write(data, 0, count);
            }
        } catch (Exception e) {
            return e.toString();
        } finally {
            try {
                if (output != null)
                    output.close();
                if (input != null)
                    input.close();
            } catch (IOException ignored) {
            }

            if (connection != null)
                connection.disconnect();
        }
        return null;
    }

    @Override
    protected void onPostExecute(String result) {
        mWakeLock.release();
        mProgressDialog.dismiss();
        if (result != null)
            Toast.makeText(context,"Download error: "+result, Toast.LENGTH_LONG).show();
        else
            Toast.makeText(context,"File downloaded", Toast.LENGTH_SHORT).show();
    }
可以看出四个方法依次被调用。doInBackground 方法是真正使用线程池进行文件下载任务的核心方法,并且在进行下载过程中调用了 publishProgress 通知下载进度,publishProgress 事实上则会导致 onProgressUpdated 被调用,可以在主线程中向用户展示下载进度。
7.理解在Android布局文件中有哪些与密度无关的计量单位。
Android 布局文件中密度无关的计量单位有:in、mm、pt、dp、sp这几种。与之相对的就是 px,是密度相关的。他们基本特征如下表所示:
| 单位 | 名称 | 单位数 / 1英尺物理尺寸 | 是否密度无关 | 不同设备上物理尺寸相同 |
|---|---|---|---|---|
| px | 像素(Pixel) | 各不相同 | × | × |
| in | 英寸(Inches) | 1 | ✓ | ✓ |
| mm | 毫米(Millimeters) | 25.4 | ✓ | ✓ |
| pt | 点(Points) | 72 | ✓ | ✓ |
| dp | 密度无关像素(Desity Independent pixels) | ~160 | ✓ | × |
| sp | 缩放无关像素(Scale Independent pixels) | ~160 | ✓ | × |
下面分别介绍一下:
- px 像素点,这是唯一密度相关的单位。
- in 英寸。屏幕上的物理英尺尺寸。是像素无关的单位,在每个屏幕上都是物理尺寸相同的。in 对应的像素点数量是因屏幕密度而异的。
- mm 毫米。屏幕上的物理毫米尺寸。也是像素无关的单位。在每个屏幕上物理尺寸相同。1英尺物理尺寸的屏幕对应 25.4 mm
- pt 点。一种常用字体单位。也是像素无关的单位。在不同密度的屏幕上尺寸相同。1英尺物理尺寸对应 72 pt
- dp 密度无关像素。也是像素无关的单位。然而,值得注意的是,在不同密度的屏幕上尺寸只是大致相同,一般1英尺大约有160dp。这取决于设备上的一个缩放系数,来自安卓系统属性文件,一般由设备厂家设置。
- sp 缩放无关像素。一般用于字体。像素无关的单位。然而,在不同密度的屏幕上尺寸也只是大致相同,一般1英尺大约有160sp。与 dp 不同的是,它的实际大小不仅由和dp相同的一个缩放系数决定。还受到系统设置中字体大小设置的影响。
8. 理解何时需要在 Activity 中重写方法onActivityResult?
当我们打开一个 Activity 并且希望这个 Activity 返回一个结果给别的 Activity 时,我们就应该调用 startActivityForResult() 而非 startActivity() 来启动 Activity,并覆盖 onActivityResult 方法来接受该 Activity 返回的结果。
比如说我们的 App 打开相机,把拍摄的照片作为结果接收回来继续运行,或者打开电话簿让用户选择联系人作为结果并返回原来的 Activity。
譬如对于联系人这个例子,启动联系人 Activity 的代码如下:
static final int PICK_CONTACT_REQUEST = 1;  // 设置请求码
...
private void pickContact() {
    Intent pickContactIntent = new Intent(Intent.ACTION_PICK, Uri.parse("content://contacts"));
    pickContactIntent.setType(Phone.CONTENT_TYPE); // 展示手机号码
    startActivityForResult(pickContactIntent, PICK_CONTACT_REQUEST);
}
上述代码中的 PICK_CONTACT_REQUEST 是一个 requestCode ,用于识别结果来源的。譬如我们一个 Activity 中既有选择联系人又有拍照的时候我们需要区分我们在接收哪一种返回结果;
然后我们在我们的 Activity 中覆盖 onActivityResult 方法,示例如下:
@Override
protected void onActivityResult(int requestCode, int resultCode, Intent data) {
    // 检查我们在接收哪一个请求的结果
    if (requestCode == PICK_CONTACT_REQUEST) {
        // 确保请求成功
        if (resultCode == RESULT_OK) {
            // 用户开始选择联系人
            // 返回的 Intent 类型数据 data 里包含了联系人信息

            // 对获得的联系人信息做后续操作
        }
    }
}
可以看出 onActivityResult 的 data 参数(intent 类型)里获取到了返回的结果。上述代码中还有个 resultCode ,是用于检查选择联系人的动作是否正常结束了,如果用户在选择联系人的界面点击了系统返回键返回到我们的 Activity,resultCode 就不会是 RESULT_OK 。
9.理解Android网络编程中,常见的数据传输格式。
一般有HTML、XML、JSON等格式。
XML
可扩展标记语言。允许用户对自己的标记语言进行定义。XML是W3C标准。
JSON
JSON,Javascript object notation,Javascript对象表示法。是一种用于资料交换的语言。
JSON的优点:
- 是一种轻量级的数据交换格式。易于人阅读和编写,同时也易于机器解析和生成。
- 相比 XML 更加简短,传输带宽要求低
- 各种语言都支持较好。服务器语言 php 原生支持 JSON,也是JSON流行的一大原因。
JSON 语法规则:
- 1、数据在键值对中
- 2、数据由逗号分隔
- 3、花括号保存对象
- 4、方括号保存数组
JSON支持以下数据类型: 整数、浮点数、字符串(需要双引号)、逻辑值(true、false)、数组(中括号里)、对象(花括号里)、null。
10.理解Android布局中常见的几种布局
Android 布局文件和 HTML 类似,通过 XML标签所代表的 UI 控件组合、嵌套而成。
有以下几种常见布局:
1.基本布局(FrameLayout)
基本布局是所有Android 布局中最基本的。因为基本布局只算是一个容器,里面所有空间都不会被指定位置,而是直接堆砌在布局的左上角,因此应用不多。但因为简单高效,在一些游戏应用中常被用到。
2.线性布局(LinearLayout)
是最常用的布局之一。分横纵向 ,通过 android:orientation 来指定横纵(vertical 垂直、horizontal 横向)。使用线性布局,只要将控件按照顺序依次编写,系统就会把控件从上到下(或者从左往右)展示出来。
3.相对布局(RelativeLayout)
该布局内部所有元素都是参照别的控件来排列的。比如说控件属性设置为“android:layout_toRight=”@+id/referBox””,就是表示当前控件在 referBox 控件右边。
4.绝对布局(AbsoluteLayout)
该布局内部的控件通过使用 android:layout_x 和 android:layout_y 两个属性来指定它相对于坐标轴原点的坐标。
5.表格布局(TableLayout)
用于展示表格型信息。TableLayout 布局有两个标签: 和 。前者是表格布局标签,后者是表格中的每一行。
6.Tab标签布局(TabLayout)
TabLayout 用于展示 Tab 标签,相对复杂,一般需要配合 Java 代码。通过对 setOnTabSelectedListener(OnTabSelectedListener) 对 tab 对象添加监听来切换 tab。
11.理解在Intent传递数据时使用的几种数据类型
Intent 可以传递的包括基本数据类型(含基本数据类型的数组)、String(包含数组)、Parcelable(包含数组)、Serializable、Bundle、CharSequence、Intent几种类型的数据。对于Map类型(超类)的数据以及Long,Integer,Double,Byte,Float,Short,由于没有 实现序列化接口,所以无法通过这种方法传递值。
Intent 传递数据的方法如下:
Intent  putExtra(String name, String[] value)
Intent  putExtra(String name, Parcelable value)
Intent  putExtra(String name, long value)
Intent  putExtra(String name, boolean value)
Intent  putExtra(String name, double value)
Intent  putExtra(String name, Parcelable[] value)
Intent  putExtra(String name, char value)
Intent  putExtra(String name, int[] value)
Intent  putExtra(String name, int value)
Intent  putExtra(String name, double[] value)
Intent  putExtra(String name, short value)
Intent  putExtra(String name, long[] value)
Intent  putExtra(String name, boolean[] value)
Intent  putExtra(String name, short[] value)
Intent  putExtra(String name, String value)
Intent  putExtra(String name, Serializable value)
Intent  putExtra(String name, float[] value)
Intent  putExtra(String name, Bundle value)
Intent  putExtra(String name, byte[] value)
Intent  putExtra(String name, CharSequence value)
Intent  putExtra(String name, char[] value)
Intent  putExtra(String name, byte value)
Intent  putExtras(Intent src)
Intent  putExtras(Bundle extras)
12.理解Android中包含哪几个标准的“选择”部件(View)。
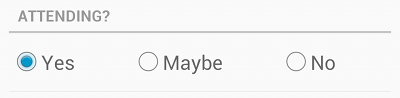
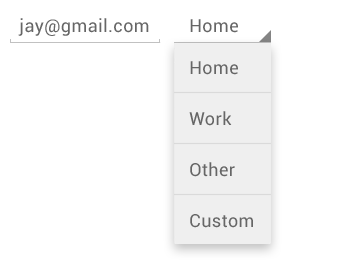
Buttons(按钮)、Checkboxes(复选框)、Radio Buttons(单选按钮)、Toggle Buttons(开关按钮)、Spinners(下拉框)、Pickers(拾取器)
参见官方文档
Buttons(按钮)
<Button
    android:layout_width="wrap_content"
    android:layout_height="wrap_content"
    android:text="@string/button_text"
    ... />
Checkboxes(复选框)
<?xml version="1.0" encoding="utf-8"?>
<LinearLayout xmlns:android="http://schemas.android.com/apk/res/android"
    android:orientation="vertical"
    android:layout_width="fill_parent"
    android:layout_height="fill_parent">
    <CheckBox android:id="@+id/checkbox_meat"
        android:layout_width="wrap_content"
        android:layout_height="wrap_content"
        android:text="@string/meat"
        android:onClick="onCheckboxClicked"/>
    <CheckBox android:id="@+id/checkbox_cheese"
        android:layout_width="wrap_content"
        android:layout_height="wrap_content"
        android:text="@string/cheese"
        android:onClick="onCheckboxClicked"/>
</LinearLayout>
Radio Buttons(单选按钮)
<?xml version="1.0" encoding="utf-8"?>
<RadioGroup xmlns:android="http://schemas.android.com/apk/res/android"
    android:layout_width="fill_parent"
    android:layout_height="wrap_content"
    android:orientation="vertical">
    <RadioButton android:id="@+id/radio_pirates"
        android:layout_width="wrap_content"
        android:layout_height="wrap_content"
        android:text="@string/pirates"
        android:onClick="onRadioButtonClicked"/>
    <RadioButton android:id="@+id/radio_ninjas"
        android:layout_width="wrap_content"
        android:layout_height="wrap_content"
        android:text="@string/ninjas"
        android:onClick="onRadioButtonClicked"/>
</RadioGroup>
Toggle Buttons(开关按钮)

Android 4.0+ 提供了Switch开关:

监听 Toggle Buttons 事件的代码如下:
ToggleButton toggle = (ToggleButton) findViewById(R.id.togglebutton);
toggle.setOnCheckedChangeListener(new CompoundButton.OnCheckedChangeListener() {
    public void onCheckedChanged(CompoundButton buttonView, boolean isChecked) {
        if (isChecked) {
            // The toggle is enabled
        } else {
            // The toggle is disabled
        }
    }
});
Spinners(下拉框)
<Spinner
    android:id="@+id/planets_spinner"
    android:layout_width="fill_parent"
    android:layout_height="wrap_content" />
Pickers(拾取器)
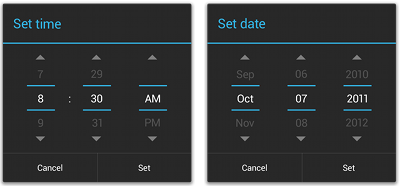
通过Java 代码继承 DialogFragment 来实现数据选取器:
public static class DatePickerFragment extends DialogFragment
                            implements DatePickerDialog.OnDateSetListener {

    @Override
    public Dialog onCreateDialog(Bundle savedInstanceState) {
        // Use the current date as the default date in the picker
        final Calendar c = Calendar.getInstance();
        int year = c.get(Calendar.YEAR);
        int month = c.get(Calendar.MONTH);
        int day = c.get(Calendar.DAY_OF_MONTH);

        // Create a new instance of DatePickerDialog and return it
        return new DatePickerDialog(getActivity(), this, year, month, day);
    }

    public void onDateSet(DatePicker view, int year, int month, int day) {
        // Do something with the date chosen by the user
    }
}
13.理解Android工程中哪些目录中的文件是由Eclipse自动编译生成的?
gen 目录和 bin 目录是自动生成的。
Eclipse中的一个典型的Android项目目录如下:
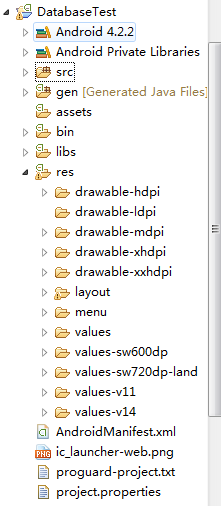
src
存放所有的java代码的地方,和普通的java项目下的src目录下的内容完全一样
gen
此目录下的内容都是自动生成的,主要有一个R.java文件,你在项目中添加的任何资源在会在这个java文件中生成一个相应的资源ID
bin
编译时自动产生的文件。
libs
存放第三方jar包,此目录下的jar包都会自动添加到构建路径中去
res
项目中存放资源的地方(图片、布局、字符串等),R.java中的内容是根据这个目录中的内容生成的。drawable目录下存放图片,layout目录下存放布局文件,values目录下存放字符串内容,menu目录下存放菜单文件
AndroidManifest.xml
这是整个Android项目的配置文件,又称清单文件
project.properties
只有一行代码。指定编译程序时所使用的SDK版本
14.理解TabHost, TabSpec, TabWidget等基本类的用法。
TabHost 是 Android 中用于显示标签布局的一个容器控件。效果如下图所示。
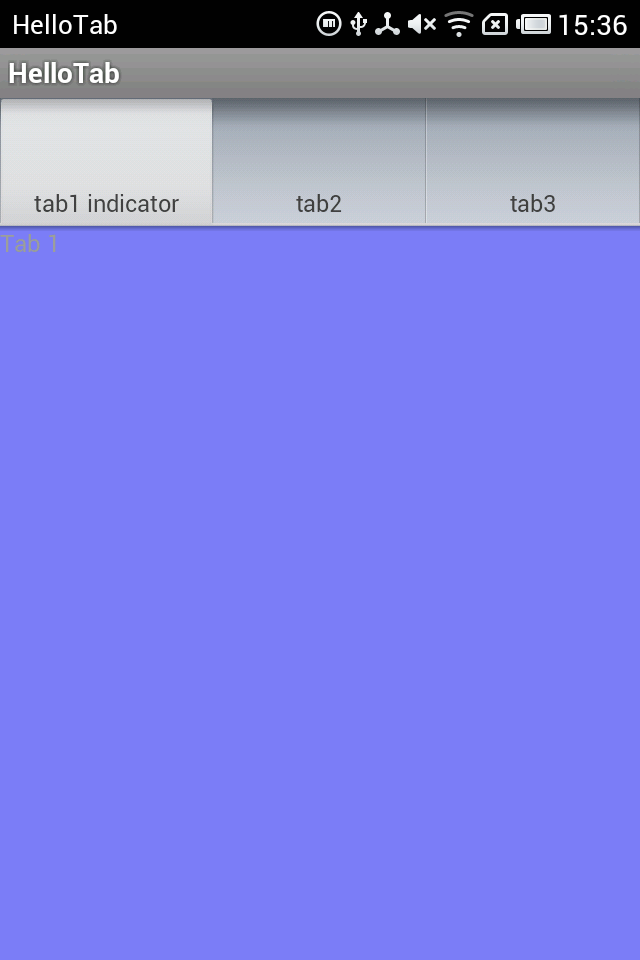
TabHost, TabSpec, TabWidget三者分别是啥?
TabHost 表示的是图中整体的 Tab 控件,他是一个容器。TabSpec, TabWidget 这两者都在 TabHost 这个容器里。TabWidget 在图中的位置是三个 tab 标题的整体,而 TabSpec 则是每一个单独的 tab 及其内容。
TabHost 在布局 xml 文件中必须包含两个子控件:一个 TabWidget 和 一个 FrameLayout。前者控制着标签 Tab 集合,后者控制着页面内容。
一个典型的 TabHost 布局文件如下:
<TabHost
        android:id="@+id/myTabHost"
        android:layout_width="match_parent"
        android:layout_height="match_parent" >

        <LinearLayout
            android:layout_width="fill_parent"
            android:layout_height="fill_parent"
            android:orientation="vertical" >

            <!-- TabWidget的id属性必须为 @android:id/tabs -->

            <TabWidget
                android:id="@android:id/tabs"
                android:layout_width="match_parent"
                android:layout_height="wrap_content"
                android:layout_weight="0"
                android:orientation="horizontal" />

            <!-- FrameLayout的id属性必须为 @android:id/tabcontent -->

            <FrameLayout
                android:id="@android:id/tabcontent"
                android:layout_width="match_parent"
                android:layout_height="match_parent"
                android:layout_weight="0" >

                <TextView
                    android:id="@+id/view1"
                    android:layout_width="match_parent"
                    android:layout_height="match_parent"
                    android:text="Tab1 Content" />

                <TextView
                    android:id="@+id/view2"
                    android:layout_width="match_parent"
                    android:layout_height="match_parent"
                    android:text="Tab2 Content" />

                <TextView
                    android:id="@+id/view3"
                    android:layout_width="match_parent"
                    android:layout_height="match_parent"
                    android:text="Tab3 Content" />
            </FrameLayout>
        </LinearLayout>
    </TabHost>
可以看出 TabHost 确实有两个子控件:TabWidget 和 FrameLayout。
xml 文件中并没有 TabSpec ,所以除了 xml 文件,我们还需要在 Java 代码中添加 TabSpec,指定每一个标签的内容。
import android.os.Bundle;
import android.app.Activity;
import android.view.Menu;
import android.widget.TabHost;

public class HelloTabHostActivity extends Activity
{

    @Override
    protected void onCreate(Bundle savedInstanceState)
    {
        super.onCreate(savedInstanceState);
        setContentView(R.layout.activity_hello_tab_host);

        TabHost tabHost = (TabHost) findViewById(R.id.myTabHost);
        tabHost.setup();

        // 这里content的设置采用了布局文件中的view
        tabHost.addTab(tabHost.newTabSpec("tab1")
                .setIndicator("tab1 indicator").setContent(R.id.view1));
        tabHost.addTab(tabHost.newTabSpec("tab3").setIndicator("tab2")
                .setContent(R.id.view2));
        tabHost.addTab(tabHost.newTabSpec("tab3").setIndicator("tab3")
                .setContent(R.id.view3));
    }

}
可以看出,我们对 TabHost 添加了三个 TabSpec 对象,TabSpec的内容由其他 xml 定义。TabHost.newTabSpec(String)方法会返回一个新创建的 TabSpec 对象,我们对该对象调用setContent方法来指定内容。
那么 TabWidget 有什么用呢?TabWidget 一般我们不需要直接交互,它是由安卓系统控制的,通知 TabHost 用户点击了哪个 Tab。我们与 TabWidget 的交互很少,一般是调用 TabWidget 的迭代器方法,来获得当前 TabHost 下有几个标签,或者是自定义 tab 列表的布局。
15.理解正确设置 onClickListener 所需要的几个基本步骤。
对控件设置 onClickListener 一般有 XML 文件指定监听方法和 Java 代码指定监听方法两种方式。
两种步骤分别如下:
方法一:
- 在布局xml文件里对控件添加 onClick 属性,指定监听方法的名字
- 在控件所在的 Activity 代码中添加监听方法 public void onClickMethod(View v)
方法二:
- 在 Java 代码中首先获取控件
- 对控件使用 setOnClickListener方法添加监听器
其中第二步骤的监听器可以通过匿名内部类或者单独的类的方式来提供。
下面是一个xml指定监听器的例子:
<LinearLayout xmlns:android="http://schemas.android.com/apk/res/android"
    xmlns:tools="http://schemas.android.com/tools"
    android:layout_width="match_parent"
    android:layout_height="match_parent"
    android:orientation="vertical" >

    <Button
        android:id="@+id/btn1"
        android:layout_width="wrap_content"
        android:layout_height="wrap_content"
        android:onClick="onClickMethod"
        android:text="按钮1" />

    <Button
        android:id="@+id/btn2"
        android:layout_width="wrap_content"
        android:layout_height="wrap_content"
        android:onClick="onClickMethod"
        android:text="按钮2" />

</LinearLayout>
MainActivity.java 中
package com.vae01;

import android.app.Activity;
import android.content.DialogInterface.OnClickListener;
import android.os.Bundle;
import android.view.View;
import android.widget.Button;
import android.widget.ImageView;
import android.widget.TextView;
import android.widget.Toast;

public class MainActivity extends Activity {

    private Button btn1, btn2;

    @Override
    protected void onCreate(Bundle savedInstanceState) {
        super.onCreate(savedInstanceState);
        setContentView(R.layout.activity_main);
        initView();
    }

    // 方法:初始化View
    private void initView() {
        btn1 = (Button) findViewById(R.id.btn1);
        btn2 = (Button) findViewById(R.id.btn2);
    }

    //方法:控件View的点击事件
    public void onClickMethod(View v) {
        switch (v.getId()) {
        case R.id.btn1:
            Toast.makeText(MainActivity.this, "btn1", Toast.LENGTH_SHORT).show();
            break;
        case R.id.btn2:
            Toast.makeText(MainActivity.this, "btn2", Toast.LENGTH_SHORT).show();
            break;

        default:
            break;
        }
    }
}
下面是一个在 Java 对控件添加点击监听的例子:
xml文件:
<LinearLayout xmlns:android="http://schemas.android.com/apk/res/android"
    xmlns:tools="http://schemas.android.com/tools"
    android:layout_width="match_parent"
    android:layout_height="match_parent"
    android:orientation="vertical" >

    <Button
        android:id="@+id/btn1"
        android:layout_width="wrap_content"
        android:layout_height="wrap_content"
        android:text="按钮1" />

    <Button
        android:id="@+id/btn2"
        android:layout_width="wrap_content"
        android:layout_height="wrap_content"
        android:text="按钮2" />

</LinearLayout>
MainActivity.java
package com.vae01;

import android.app.Activity;
import android.os.Bundle;
import android.view.View;
import android.view.View.OnClickListener;
import android.widget.Button;
import android.widget.Toast;

public class MainActivity extends Activity {

    private Button btn1, btn2;

    @Override
    protected void onCreate(Bundle savedInstanceState) {
        super.onCreate(savedInstanceState);
        setContentView(R.layout.activity_main);
        initView();
    }

    // 方法:初始化View
    private void initView() {
        btn1 = (Button) findViewById(R.id.btn1);
        btn2 = (Button) findViewById(R.id.btn2);

        btn1.setOnClickListener(new OnClickListener(){
            @Override
            public void onClick(View v) {
                Toast.makeText(MainActivity.this, "btn1", Toast.LENGTH_SHORT).show();
            }

        });

        btn2.setOnClickListener(new OnClickListener(){
            @Override
            public void onClick(View v) {
                Toast.makeText(MainActivity.this, "btn2", Toast.LENGTH_SHORT).show();
            }

        });
    }
}